# Support
Main Support Documentation
# 📦Choosing services & Hardware
---
# What should I choose?
Choosing a specific service for you can be daunting for some beginners. But hopefully this guide will help you choose which server is the best for your use case.
### Types of servers & Services
We offer Minecraft, Rust, Asseto corsa and many more game servers to choose from. We also have support to use our own domains. But mainly, we will be talking about game servers.
Dependent on which game server you are looking to run, the required hardware can vary. But our plans can help you to decide which server is the best for you.
---
# What does each feature mean?
## Hardware
### RAM
RAM (Random Access Memory) is instructions the server stores temporarily, which gets lost when ever the server powers off. These instructions may include the players current location, what the weather is in the game, etc. Usually the more RAM you see in a server means faster performance, but that also is dependent on the CPU Cores.
### CPU Core(s)
a CPU Core is a single processing unit within the CPU (Central Processing Unit). Each CPU Core allows for the server to run 1 action at a time. So this means with 1 core, actions are queued, and then can only be executed one at a time. these actions are done really fast, but if you require a high demand server, we would recommend more than 1 core.
Multiple cores mean more actions that can be taken place at one go. If I had 2 cores, 2 actions can take place at once, 3 cores means 3 actions can happen at once, and so on.
## Storage
The storage on your server is how much content you can save to our secondary storage devices. This is usually measured in Gigabytes (GB), but some servers if specially requested can have Terabytes (TB) in size
## Software
### Databases
Databases are a way for applications to interact with a storage method. We use MariaDB / MySQL For our services. An example this may be helpful if with a plugin on Minecraft called "LuckPerms". This plugin allows server owners to create permissions, giving specific users, or a group of users access to certain function in there server. These permissions can be saved in a file on the Minecraft Server itself. Or it can be stored in a Database. This is particularly helpful if you are running a bungeecord network, which requires a dynamic link, so then all permissions can be written to the same database, and then read from the same database across multiple servers, syncing them up.
### Backups
Backups are a way to frequently copy your server files automatically (or manually), which means that if something terribly wrong happened with your server. You can easily rollback the changes from your last backup.
Backups are necessary for high demand servers, or even a server with a couple of friends. But ether way, there is no reason not to be safe and back up your server, unless you are running the server as a test.
---
# Conclusion
For beginners servers are not as confusing as you think, have a play around, experiment with some servers and have fun.
---
# ❓About AtomicHost
---
# Backstory
---
AtomicHost, Created and maintained by Fin - Mostly known by the username "FinGymPlayz" online - has always had a passion in Computer Science, Server Management, and Software Engineering. He made it his journey with a lot of trial and error, to start up his own Minecraft Server. This Minecraft server he made went by the name of "LifeServer". The LifeServer lived many years, but eventually met its end. After learning about how Minecraft server work, He also got interested in making Servers on other games, these servers were just private servers for his friends, on games like Rust, BeamNG, and FiveM.
---
# AtomicHost
---
I made AtomicHost after many years of hosting, and learning how a majority of game servers work. I decided to share my knowledge with the world, in a cheap and affordable game server hosting.
Trailer: https://www.youtube.com/watch?v=2J6-Qd8fCbk
# 🫰Upgrading Plans
---
# How to Upgrade or Downgrade your Server plan
---
1. By navigating to your Server dashboard. Select the server you would like to upgrade or downgrade
2. Click on the "General" tab
3. Press on "Upgrade Package/Plan"
4. You will now be given the decision to change your current plan
## Things to note
These plan changes are instant. Here at AtomicHost, we are about efficiency, and minimizing down time. This means, even when ever you upgrade or downgrade your server, you will not have to restart it!
# 🌐Domains
We allow free subdomains on our `atomichost.xyz` domain, allowing for more customisation for you
---
### 1. Head over to your server settings
Go over to your server settings, by choosing which server you want to change the domain on on the dashboard, then clicking `manage`, then you wills see a domain box, here you can enter in the custom subdomain you want to use
# 📅Schedules
---
Schedules are a way to run commands, or server events like backups, restarts etc on a schedule.
This can be helpful if you want to automate time consuming tasks.
---
### Start by heading to the `Schedules` tab on your server
Here you can press the `Create` Button, this will create your first schedule
[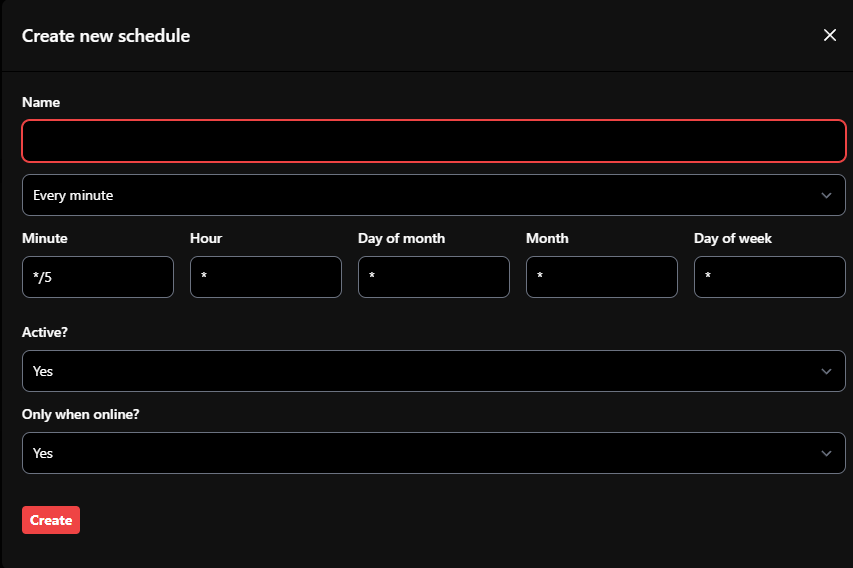](https://docs.atomichost.xyz/uploads/images/gallery/2025-10/image-1761780999219.png)
*Name:* The name of your scheduled task (For organisation)
*Time*: This selection box allows you to select presets, e.g. Every minute, week, month etc
*Minutes, Hour, Day Of Month, Month, Day of week*: Allows you to set specific times, do not touch this is you do not know what you are doing
*Active*: Is this schedule active / allowed to run?
*Only When Online*: Should this schedule run only when the server is online?
When you have filled out the details, click `Create`
[](https://docs.atomichost.xyz/uploads/images/gallery/2025-10/image-1761781064973.png)
Now your schedule has been created, we need to add some commands / events for it to run.
To do this click `View` on your schedule, then click `New Task`
[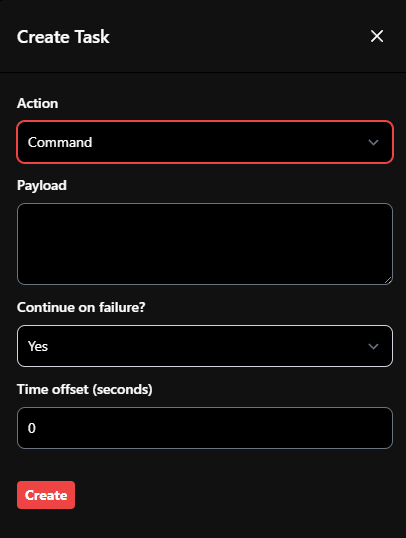](https://docs.atomichost.xyz/uploads/images/gallery/2025-10/image-1761781084597.png)
*Action*: What type of action will it perform? A command, Power (turning server on, off, or restart), Backup.
*Payload*: Only needed if the action is `Command`, here is where you will enter in the command which will be executed in the console.
*Continue on failure*: If other tasks in the schedule failed, should it still run this task?
*Time Offset*: How many seconds would you like this task to be offset compared to the rest (if there are any others).
When you have finished, press `Create`
---
### `Error! The cron data provided does not evaluate to a valid expression`
This error means that the Cron input (the scheduled time) is not in the correct format.
#### The correct Cron Format sheet:
| Field | Position | Allowed Values | Description | Example |
|-----------------|----------|------------------------|--------------------------------------------|------------------------|
| Minute | 1 | 0-59 | The minute of the hour to run at | `0` = on the hour |
| Hour | 2 | 0-23 | The hour of the day to run at | `14` = 2 PM |
| Day of month | 3 | 1-31 | The day of the month to run on | `1` = first day |
| Month | 4 | 1-12 | The month to run in | `12` = December |
| Day of week | 5 | 0-6 (0 = Sunday) | The day of the week to run on | `1` = Monday |
### Special Characters
| Symbol | Meaning | Example | Result |
|--------|--------------------------------------------------|---------------------|------------------------------------------------|
| `*` | Every possible value | `* * * * *` | Runs every minute |
| `,` | Multiple values | `1,15` in minutes | Runs at minute 1 and 15 |
| `-` | Range of values | `1-5` in hours | Runs at hours 1,2,3,4,5 |
| `/` | Step / interval | `*/5` in minutes | Runs every 5 minutes |
### Common Examples
| Cron Expression | Meaning |
|----------------------|----------------------------------------------|
| `0 0 * * *` | Every day at midnight |
| `*/5 * * * *` | Every 5 minutes |
| `30 14 * * 1` | 2:30 PM every Monday |
| `0 */6 * * *` | Every 6 hours |
| `0 0 1 * *` | Midnight on the 1st of each month |
# 📊Databases
---
Start by navigating to your servers panel - from the dashboard.
Click "Database" in the side view.
Next click "Create" in the top right corner
Name this something appropriate for what you need it for (recommended)
Clicking "View" on the database gives you more information as shown below
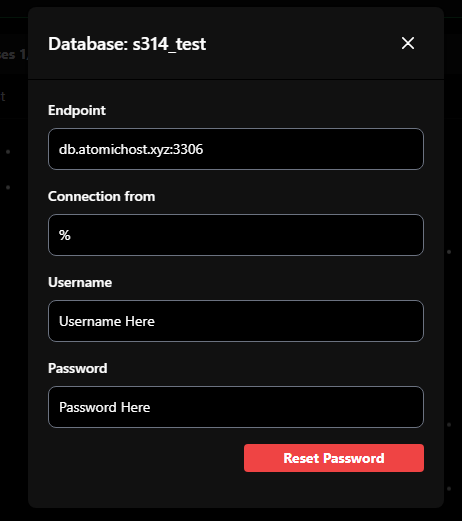
In this example, we can view the "Username" and the "Password" of the database.
Keep the "Connection from" to %
There may be a configuration file you may have to enter these details in to allow it to connect
After creating your database you should see something like the following:

In the example above,
"S314_test" is the database name
"db.atomichost.xyz" is the host
"3306" is the port
If you have any furthur questions, please open a ticket, our staff will support you.
# 🌐Proxies - How they work
---
# What are they?
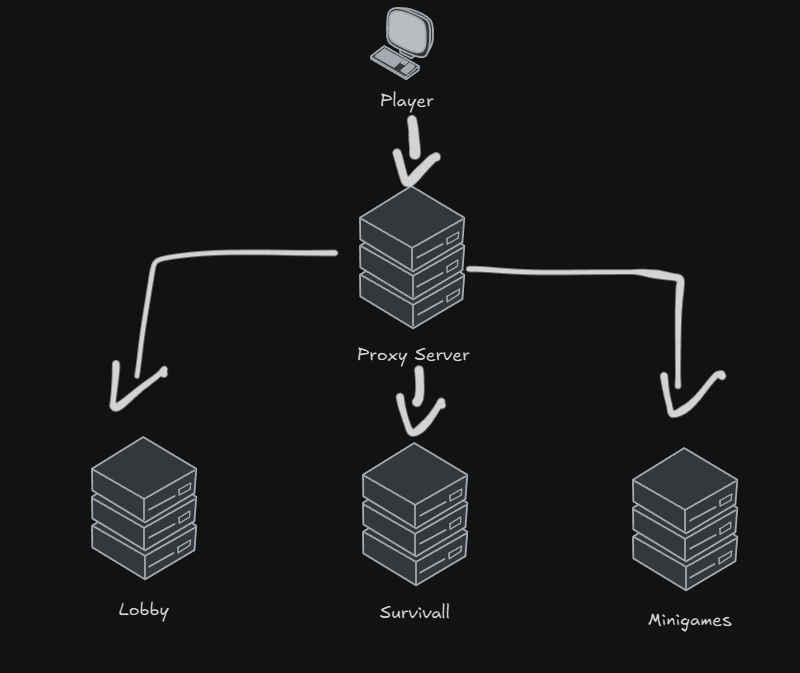
Proxies are a dedicated server, which handles connections between back end servers.
### What's are backend servers?
Backend Servers are multiple servers running separately. Using Minecraft as an example, these backend servers are separate servers, like a lobby, survival server, etc.
## What does a proxy do?
The proxy handles these connections. So a client (a user), will connect to the proxy, and then the proxy can decide what backend server they will redirect the user to. and when ever they are connected to a backend server, the proxy can interrupt the connection, and force them to switch servers.
---
# How is a proxy useful?
Proxies are extremely useful if you know what you are doing. Likewise, using Minecraft as an example, if a user is playing on the *Survival* server, and somehow the server crashes, the proxy can detect that there are no packets being sent to that server, which triggers the proxy to send users to the lobby. This means that if one server on your network crashes, all the other servers will still stay online.
This also allows for you to separate what's on each server. If you had just one single server without a proxy, all your plugins will be duplicate across servers (If you are using multiverse), this is not ideal, as you may be able to access commands you only want available in one server, to be executed in another. This is where proxies allow you to put plugins on different servers, as in simple, you are just creating an entire new server for different use cases.
---
[](https://docs.atomichost.xyz/uploads/images/gallery/2025-10/image-1761781263880.png)
# 🔃Changing Environment Varibles
---
You can change environment varibles, this may include the `server version`, `server image`, `Java Image`, `Name of the server`, etc.
---
### How can i change these varibles?
1. Select `Settings` on the server you want to edit
2. Change the varibles as needed, by clicking `update` to update them
#### Why does my new varibles not update on my server?
The server varibles may sometimes require a server restart, or in some cases when you are changing the image the server is using, you may need to reinstall the server
***Note: Reinstalling the server will not wipe data, it will just re-run the same installsation script as it ran when the server was first created, we do recommend making backups whenever you do choose to reinstall the server if there are any vital data to your server***
# 🚢Ports
---
Server ports allow TCP and UDP connections into your server, allowing for multiple services to run at once
---
### Examples of multiple ports being used:
Your main server should always run on your **Primary** port, if this is to be Minecraft, Rust, FiveM etc; Other services, for an example simple voice chat may require an additional port to function, this is where another port for your server will be needed.
### How to create a port on my server?
To create a port, you can head over to the server you want to edit, and select the `Networking` tab, here you can click `Create` in the top right hand corner to create a new port.
Now you can input this new port into a config file to be used.
#### Why can i not create another port?
Sometimes the server plan you have bought may not support an extra port, in this case you will have to open up a support ticket, and explain your issue, and our team will assist you further.
# 💳Giftcards
---
### To Create A Gift Card
- Head over to the Gift Card Dashboard
- Select Buy GiftCard
- Enter in the amount of money you would like to gift
- Enter in the email of the user you want to send it to (optional --> This will send the user an email)
- Enter a message (optional --> this will show in the users email)
- Select a payment method, we do allow you to use your AtomicHost Balance
- Then select Pay Now
### To Redeem a Gift Card
- Head over to [GiftCard Redeem](https://atomichost.xyz/giftcard/redeem) page
- Enter in the code for the gift card
- and press redeem
# ❤️🩹Recover Data
---
Recovering data is possible depending on the status of your server.
---
### Check if your server is eligible for your data to be recovered
To do this, next to your server on the [dashboard](https://atomichost.xyz/dashboard) will have a status, which will ether be:
- Active
- Suspended
- Canceled
- Terminated
***Active:*** Your server is fully working, all data is still on the `files` tab and can be downloaded directly over the website (not recommended) or over FTP (recommended)
***Suspended:*** Your server data is still there, some services may not function properly, however you have very restricted access to your sevrer, a server suspension is usually caused my a declined or unpaid invoice for your server, to fix this make sure you have paid for the server.
***Canceled:*** Your server data is still there, however all services are unavailable on your server. To recover your data you will have to open a support ticket to temporarily open your server and for you to manually recover your data, or you can uncancel your server and pay for the next month.
***Terminated:*** All your server data has been deleted from our servers, and there is no way to recover your data.
Your sevrer will go through phases after a forgotten payment:
- Phase 1: Server Suspended
- Phase 2: Server Canceled
- Phase 3: Server Terminated
# 💪Custom Plans & Upgrades
---
### Here at AtomicHost we fully support custom plans & upgrades for your server!
---
### How can I create a custom server?
To enquire on a custom server to meet your needs, you can create a support ticket, or directly message a higherup on the [discord](https://atomichost.xyz/discord). We do support handling this over tickets, but note this may take longer for responses!
#### Can I do a custom upgrade on my server?
If you want to upgrade just your `RAM`, or just your `CPU Cores` etc, you can!
To do so, please open a support ticket, and enquire on your custom upgrade!
# 📧Invite users to manage your AtomicHost Server
---
You can invite users to your server, allowing for them to have access to certain permissions and actions on your server, or have full administration access to your server.
### How to invite someone to my server?
To invite someone to your server, you will have to select the `Members` tab when on your chosen server.
Here you can click the `Invite Members` button at the top right
[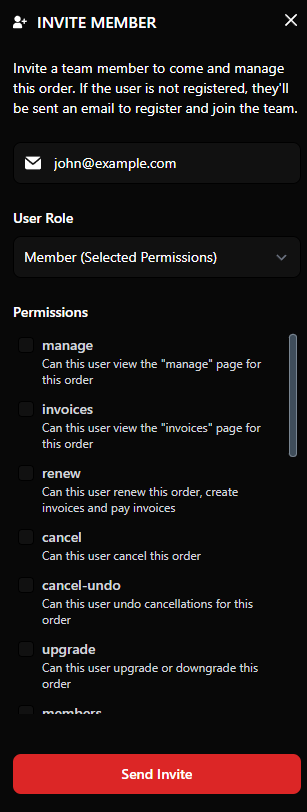](https://docs.atomichost.xyz/uploads/images/gallery/2025-10/image-1761832467553.png)
You will now have to enter in the email which the user you want to invite has used to create an AtomicHost account, if they don't have an account already, please ask them to [signup](https://atomichost.xyz/auth/register).
After entering the email of the user can you select the user roles manually, which gives you control over what that user can acess, or you can give them full administrator access, which allows them to access any part of your server.
# ▶️Why is my server not starting?
---
There are many factors which can determin why your server is not starting.
##### 1. Check your startup script
> you can check your startup script by heading over to the `Settings` page on your selected server
>
> here is where you will be able to view your startup command. If this is blank, your server will not start up, and you will have to open a ticket to get this resolved.
##### 2. Check the status of AtomicHost
> On a rare occasion, the atomichost servers may be down, you can check over our status page [here](https://status.atomichost.xyz)
>
> If the `Servers/Node` are down, then you will be unable to access your server temporarily. If this is the case please allow a few hours for our services to come back online, and check our [discord](https://atomichost.xyz/discord) for more updates
# 🤝What is a Partnered Server on AtomicHost?
---
A partnered server is a server that is ran on AtomicHost that is not owned by us, but by a member of the community. We choose these servers based of how well built and how enjoyable they are.
Partnered Servers are essentially to show new members what can be done with AtomicHost, and how they can do the same!
#### What benefits do you get from being a partner with AtomicHost
- You will get priority support
- You will get featured on the front page of AtomicHost
- You may get a heavily discounted price
- You will get early access to features and tools
---
# 🔌SFTP / FTP (Remote File Access)
---
Here at Atomic Host we offer a built in file manager. However we do also offer SFTP (Secure File Transfer Protocol). This allows you to use software on your computer, In our case we recommend using [WinSCP](https://winscp.net/eng/download.php) as it is free to download.
---
# WinSCP Connect (EASY)
---
### Software
Firstly, install your FTP / SFTP software of choice, we highly recommend using [WinSCP](https://winscp.net/eng/download.php) as it is free to download. You may use a different preferred software instead.
### Connect to SFTP
Head over to your servers `Settings` Page and click on the `Change Password` Button
After changing your password click on the `Launch SFTP` button >> This should launch WinSCP
[](https://docs.atomichost.xyz/uploads/images/gallery/2025-10/image-1761833783990.png)
When WinSCP loads up, you can now type the password you just entered in when you clicked the change password button, then hit `ok`
[](https://docs.atomichost.xyz/uploads/images/gallery/2025-10/image-1761833873757.png)
You should now have full access to your servers files!
---
# Manually connect to SFTP (HARD)
---
### Where can i find my SFTP Details?
You can find your SFTP Details by navigating to:
```
Your Server >> Settings >> SFTP
```
Here you will see your **Host name**, **Port** and **Username**. If this is your first time using SFTP on this server, please click the `Change / Reset Password` Button.
### How to connect to SFTP with FileZilla
When you have opened FileZilla, Navigate to
```
File >> Site Manager
```
On the left you will see all your sites / servers you can connect too. We need to add your server to this list, so to do so press
```
New Site
```
Next, make sure the following settings are as shown
```
Protocol: SFTP - SSH File Transfer Protocol
Host: HOST-NAME-HERE PORT: 2022
Logon Type: Normal
User: USER-NAME-HERE
Password: PASSWORD-HERE
```
You can optionally add a comment. Otherwise, you can press
```
OK
```
Now. To connect to your SFTP, you can navigate back to
```
File >> Site Manager
```
then single left click on your new server entry, then press
```
Connect
```
***If you have any problems, don't hesitate to contact our staff!***
---
# 🔑Discounts / Promo Codes
---
On special events we may run certain promo codes. For an example at Christmas we may do a 25% off or even a 50% off deal!
# 👏How to connect Bungeecord to Paper servers
---
By default **you need to manually connect your paper / backend servers to your proxy!**
#### Step 1
We need to configure all your backend servers to support the bungeecord proxy
On you paper server(s), go to the `spigot.yml` and set `bungeecord` to
```yml
bungeecord: true
```
Next in the `server.properties` file, ensure that `online-mode` is set to `false`
***Note: you have to do this on all backend servers***
#### Step 2
On your bungeecord server, find the file in the main directory called `config.yml`, here is where you will find a `server` section. Here you need to spesify every server
Here is the structure of the `server` section
```yml
servers:
NAME-OF-SERVER:
address: SERVER-IP
motd: 'MOTD / SHORT DESCRIPTION'
restricted: false - keep this
```
Here is an example:
```yml
servers:
lobby:
address: play.atomichost.xyz:0001
motd: '&1Lobby Server'
restricted: false
survival:
address: play.atomichost.xyz:0002
motd: '&1Survival Server'
restricted: false
```
Lastly, restart both the proxy and all your back end servers, and then everything should work!
if you have any issues don't hesitate to open a support ticket!
to learn more about how proxies work, [click here](https://docs.atomichost.xyz/books/support/page/proxies-how-they-work)
# Minecraft
All support documents about Minecraft
# 💻Out of memory error
---
This error means that the server has fully used up all the RAM that has been allocated to it. Once the server runs out of memory, it can no longer store or process data, which usually results in crashes, lag, or the server completely shutting down.
### Why does this happen?
Servers use RAM to store all the active runtime data — this includes plugins, mods, world data, entities, chunks, and anything else the server needs to function. When the usage reaches the limit, the server cannot continue running correctly.
---
## How to Fix It
There are a few ways to resolve this issue depending on your setup and requirements.
### 1. Remove or Optimize Plugins / Mods
If you're running a large amount of plugins or mods, some may be heavy on memory usage. You can:
- Remove unnecessary plugins or mods.
- Replace memory-heavy plugins with lighter alternatives.
- Check for memory leaks (plugins that use more RAM the longer the server runs).
- Lower view distance in your config files.
### 2. Reduce Server Load
Things that increase RAM usage:
| Feature | Impact |
|--------|--------|
| High render/view distance | Very High |
| Large amounts of entities (mobs, animals, etc.) | High |
| Many loaded chunks | High |
| Heavy modpacks | Very High |
Reducing these can significantly lower RAM usage.
### 3. Purchase More RAM
If your server still runs out of memory after optimizing, the simplest solution is to upgrade your plan and allocate more RAM. This will allow the server to store and process more data without crashing.
---
# ⚠️Error: Unable to access jarfile server.jar
---
This error is occoured whenever the `server.jar` file can not be found in the root directory, the resolution to this issue is to ensure that the [environment varibles](https://docs.atomichost.xyz/books/support/page/changing-environment-varibles) are set correctly, or by manually downloading the `server.jar`
# 🧳Server Resource Packs (Minecraft)
---
To add a custom resource pack, you will need to upload your resource pack via one of the following options:
- A public dropbox link
- AtomicHost webserver
#### A public dropbox link:
1. Upload your resource pack .zip to dropbox and make sure it is public
2. in your `server.properties` file on your server, find where it says `resource-pack`
3. after the `=` paste in the link in
4. ***IMPORTANT:*** Make sure at the end of the link it says `?dl=1` not `dl=0`
#### AtomicHost Webserver
1. Purchase an [web server](https://atomichost.xyz/store/website) (make sure wordpress is turned off).
2. On your server, in the `webroot` folder, upload the .zip file
3. On the server console, copy the ip, and paste it into your browser
4. on the end of the link, put in the name of the file, e.g. if your .zip file is called `pack.zip` you would put `https://atomichost.live:0000/pack.zip`
5. in your `server.properties` file on your server, find where it says `resource-pack`
6. after the `=` paste in the link in
***You will have to restart your server to see your changes be affected***
# 🌍Change Generated World (Minecraft)
---
1. Turn your server off
2. Delete the `world` folder
3. In the `config` folder, delete both the `paper-world-defaults.yml` and the `paper-global.yml` file
4. Turn your server on
# 🌎How to disable the nether and/or end in java
---
#### Nether
Open the `server.properties` file and set `allow-nether` to `false`
#### End
Open the `Bukkit.yml` file and set `allow-end` to `false`
# 🔌Recommended Plugins
---
#### Survival Server
- EssentialsX + Vault - Very good for economy, tpa, random tp etc
- EconomyShopGUI - Very good shop plugin for economy servers
- CombatLogX - Good for preventing combat logging by killing the player if they logout during combat
- PicoJobs - Good job plugin for players
#### Lobby Server
- DeluxeHub - Good for managing the lobby for your server
#### Permissions
- Luckperms - Industry standard for managing permissions, Database support allowing for permissions to sync across a proxy
#### Cosmetic
- DiscordSRV - Sync Discord chat and Minecraft chat so people from discord can speak to people in Minecraft
- FAWE (Fast Async World Edit) - World edit but better
- WorldGuard - Allows you to set permissions in certain areas, so certain players can't break blocks in your lobby for an example
# ⚠️Flying is not enabled on this server fix
---
To fix the `Flying is not enabled on this server` in minecraft java,
Head over to your `server.properies` file and set `allow-flight` to `true`,
***Note this will not effect your anticheat***
# 🛹Server Stats Plugin
## (Velocity, Bungeecord or Paper)
---
To add a dashboard with stats (for server details) follow these steps:
## Requirements
- First make sure your proxy / Paper server is the latest version
- Download [serverpulse](https://github.com/renvins/serverpulse/releases/tag/v0.5.2) Download the correct file depending on what you are running, so if you were running paper, download the `paper.jar` and if you are running bungeecord download the `bungeecord.jar`
- make a account at [influxDB](https://cloud2.influxdata.com/signup)
## Setting up influxDB
1. Create your account or login
2. Follow the setup intructions (company name and organization)
3. On the same page, choose a server the closest to you (US OR EU)
4. Select the free account, you wont need more (for now)
5. Click on "Manage Databases & security"
6. Click on "GO TO BUCKETS" next to database manager.
7. Press "Create a bucket"
8. Give your bucket a memorable name
9. keep the option on 30 days.
10. At the top click "API TOKENS"
11. Generate a api token (all access)
12. give your token a brief description (or none at all)
**13. SAVE YOUR API TOKEN, YOU WILL NEED IT. BY NOP COPYING IT AND NOT SAVING IT, YOU WILL NOT BE ABLE TO VIEW IT AGAIN**
## Setting up
1. Upload the serverpulse.jar to plugins folder
2. Start up the server (quick warning, the server will not **start** after the restart)
3. go back to plugins then go to the serverpulse folder
4. open the config.yml
5. fill out the config like this:
```yml
url: # This is the url at the top of your page, it will looks like this: "https://eu-central-1-1.aws.cloud2.influxdata.com" it will be diffrent based on your location.
org: # This is your organsations name, please put exactly what you called your organisation. To view your organsation name, go back to influxdb click on your account name and click "Organisations"
bucket: # the name of your bucket, to view it go back to influxdb, click "manage databases and security" then go to database manager and then you can view your buckets.
token: # Your api token you copied / saved.
table: # call anything you want
```
After filling the config up, now restart you server.
## Dashboard
1. Go back to influxdb
2. On the sidebar click the 4 squares (should say "dashboards" on hover)
3. Create a dashboard
4. Press "new dashboard"
5. click "add cell"
6. Select you bucket
7. Click "all measurements" or what you called your table
8. click the option / stat you want to view
9. select the server name (should be "velocity1", if you changed it, it should be there)
10. Press submit
**Congrats, you have made your own dashboard!**
- Credits to NZYZE for the documetnation
# ⛓️💥How to make your server cracked
---
To make your server **cracked**, open your `server.properties` file, and set `online-mode` to `false`
To make your server **paid accounts only**, open your `server.properties` file, and set `online-mode` to `true`
# 🌍How do i change the seed / world of my server?
---
Changing the seed of your server is quite easy to do
---
### 1. Stop the server
#### Ensure the server is offline, this is not optional
### 2. Delete old world files
#### Delete the following folders:
- `world` [Required] - Overworld files
- `config` [Required] - World config
- `world_the_end` [Recommended]
- `world_nether` [Recommended]
### 3. Change the seed in the `Server.properties` file
#### Open the `server.properties` file and set `level-seed` to your seed, e.g.
`level-seed=123456793079414942`
### 4. Finishing
#### Save the file, and start your server
# ⚠️Current Java is 17 but we require at least 21
---
This error may not be exactly the same, but the fix to this is to change your java version to the java version which the error requires you to use. For an example, in this error:
`Exception in thread "main" java.lang.IllegalStateException: Current Java is 17 but we require at least 21`
It states that we are using `Java 17` but the version of Minecraft we have installed requires `Java 21`.
To change the java version, head over `Settings` and change the `Java Version` Varible to the correct java version.
# Rust
All support documents about Rust
# 🔌How can i add plugins?
---
##### Before adding plugins, make sure you are running ether oxide or carbon
trusted places to get plugins from include [uMod](https://umod.org/plugins?category%5B%5D=Rust&page=1&sort=title&sortdir=asc&categories=rust) (Oxide)
When you download a plugin, it should download as a `.cs` file
on your servers `files` tab, open the folder `oxide` or `carbon` and then open `plugins`, here upload the plugin ending in `.cs` into this folder.
Your server should automatically detect a new plugin, stating something like the following:
```
Loaded plugin
```
If it doesn't auto load, run
```py
oxide.reload
```
or restart the server.
# 🤵How to give yourself admin in rust.
---
To give yourself admin, you have to run the following command:
```py
ownerid ""
server.writecfg
```
To find your `steamid` you can click your profile in the top right of the steam app, then click `Account Details`, then at the top left under your username, will be your `steamid`
To remove an owner run:
```py
removeowner
```
# 🔑Permissions in Rust
---
Some plugins may require permissions to use, you can manually give users permissions by running:
```py
oxide.grant user
```
To remove a permission from a user you can run
```py
oxide.revoke user
```
Or you can grant an entire group (more practical)
```py
oxide.grant group default
```
#### Creating & managing groups
Create a group
```py
oxide.group add
```
Remove a group
```py
oxide.group remove
```
Add a user to a group
```py
oxide.usergroup add
```
# 🔗How do i connect to my rust server
---
To connect to your rust server, you can do one of the following:
#### Search for your server in the Community / Modded Tab
##### (May take up to 24 hours to show)
You can search for your server name which you spesified in the settings, or before purchasing the server.
#### Manual Connect
##### (Will work instantly after server has started)
When Rust has loaded, press `f1` and run `client.connect `, this can be found on the `console` tab.
# FiveM / RedM
All support documents about FiveM
# 🔗How do i connect to my FiveM Server?
---
To connect to your server in FiveM, there are 2 main ways of doing so:
#### Search for your server
##### (May take up to 24 hours)
In the search menu, you can search for the name of your server you spesified in the settings, or before you purchased the server.
#### Manually connect via the IP
##### (Will work instantly after the server has started)
In the search menu, type `>SERVER-IP`, make sure to include the `>` otherwise it will not work!
# 📐How can i setup my server?
---
When your FiveM Server starts up for the first time, **you will see a URL in the console**, copy this URL and paste it into a new tab on your browser.
Follow the instructions on screen to make your server exactly how you like it!
# ⚠️Error: Could not authenticate server license key. Invalid key format
---
This issue is caused by an `Invalid Authentication Key`, you can fix this by heading over to [keymaster](https://keymaster.fivem.net/) and getting a **free key** for your server.
When you have got a key, head over to the `Settings` page on your server, and paste the key into the `fivem license` box.
Click `Update` and then restart your server,
***In some cases you may need to click `Reinstall`***
# 💸How to monetize your game server.
---
To monetize your game server, you can install [Tebex](https://www.tebex.io/) onto your server, which gives your server a website for players to be able to purchase in game items, ranks and more!
#### Create a [Tebex](https://www.tebex.io/) account
Create a [Tebex](https://www.tebex.io/) account and install it onto your server by heading over to [https://www.tebex.io/](https://www.tebex.io/)
On this page you can customise your stores website to fit your needs!
After installation, you will have to link it from your Minecraft, Rust or FiveM server to the tebex page. There will be clear steps to show you how to do this
# ⚠️500 Server Error when trying to add a subdomain
---
On a rare occasion, the error code `500` may be thrown if the name of your subdomain was already used previously by a now terminated server.
There are 2 ways to fix this,
Number 1 being to use a different subdomain,
Number 2 is to open a support ticket, and ask for the domain to be deleted in the records because of the 500 server error.